Essential Solutions for Professional Carburetor Cleaning and Maintenance
Maintaining optimal carburetor performance requires specialized cleaning solutions that effectively remove fuel deposits, varnish, and carbon build up. Professional mechanics and DIY enthusiasts rely on proven carburettor cleaning products to restore engine efficiency, eliminate rough idling, and prevent costly repairs. These powerful formulations dissolve stubborn contaminants while protecting sensitive engine components.
A properly functioning carburettor ensures the precise air-fuel mixture essential for combustion. When deposits accumulate from contaminated fuel or extended storage, engines develop performance issues including hard starting, stalling, and reduced power output. The cleaner dissolves deposits in your carburetor and choke, and consequently can reduce your need for maintenance, repair, and downtime.
The carburettor, invented by automotive pioneer Karl Benz in the 19th century, remains critical in vintage vehicles, motorcycles, and small engines. While modern vehicles use fuel injection systems, millions of petrol engines still require specialized maintenance. Understanding which high-performance carburetor cleaners deliver professional results can save both time and money.
Professional Immersion Carburetor Cleaners for Deep Cleaning
Berryman 0996 Chem-Dip Carburetor Parts Cleaner
This fast-acting immersion cleaner removes gum, varnish, sludge, carbon, and grease without heat or agitation. The non-chlorinated and nonflammable formula is VOC-compliant in all states and safe on plastic and rubber. Professional mechanics prefer this premium carburetor dip cleaner for complete carburetor rebuilds.

20/06/2026 5:06 am
The 0.75-gallon container includes a dip basket for convenient parts immersion. The cleaning process takes 15 to 30 minutes without heat, aeration, or agitation, making it ideal for busy repair shops. This non-chlorinated carburetor cleaner won’t cause rust or damage to metal alloys.
Key Features:
- Fast 15-30 minute cleaning cycle
- Safe for metals, plastics, rubber, and alloys
- Non-flammable, low-odor formula
- VOC-compliant in all 50 states
- Includes convenient dip basket
Best For: Professional mechanics, complete carburetor rebuilds, transmission components, and vintage engine restoration.
Limitations: Higher initial cost compared to spray cleaners; basket size limits larger components.
“I used Chem Dip today to clean the CARB on my Farmall 450 tractor and now it runs great. Before today the tractor would not run unless it was at full choke,” reports one satisfied customer who experienced immediate performance improvements.
Aerosol Carburetor Cleaners for Quick Maintenance 🚗
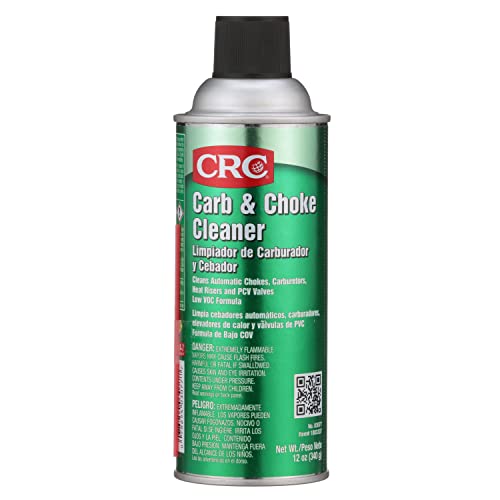
CRC 03077 Carb and Choke Cleaner
This fast-acting carburetor spray cleaner excels for routine maintenance and emergency repairs. The low-VOC formula meets both California and EPA regulatory requirements, ensuring compatibility with catalytic converters and oxygen sensors. Professional technicians choose this eco-friendly carburetor cleaner for its convenience and effectiveness.
20/06/2026 5:06 am
The precision straw attachment enables targeted cleaning of jets, passages, and linkages. This professional-grade carburetor spray dissolves gum, varnish, and sludge quickly without requiring disassembly.
Key Features:
- Meets California VOC and EPA standards
- Precision application straw included
- Safe for catalytic converters and oxygen sensors
- Quick-dissolving deposit removal
- 12-ounce aerosol format
Best For: Fleet maintenance, emergency roadside repairs, routine cleaning, and preventive maintenance.
Limitations: Smaller container size requires frequent replacement; not suitable for rubber or plastic components.
Berryman B-12 Chemtool Carburetor Cleaner
This high-energy solvent technology delivers rapid results with no residue remaining after application. The advanced carburetor cleaning formula works on carburetors, throttle bodies, PCV valves, and fuel system components. Professional mechanics appreciate its versatility and effectiveness.

20/06/2026 5:06 am
Available in multiple sizes, this multi-purpose engine cleaner provides excellent value for high-volume users. The fast-drying formula enables immediate engine operation after cleaning.
Key Features:
- 100% high-energy solvent technology
- Zero residue after cleaning
- Multiple container sizes available
- VOC-compliant nationwide
- Fast-dissolving action
Best For: Professional shops, motorcycle maintenance, marine applications, and small engine repair.
Limitations: Higher cost per ounce; highly flammable requiring careful handling; no precision applicator included.
“I was looking for a fuel injector cleaner to treat a rough idle on my 2010 GMC Sierra… The first can straightened out the problem. I recommend to everyone,” shares a user who experienced immediate idle improvement.
Selecting the Right Carburetor Cleaning Solution 🎯
Chlorinated vs Non-Chlorinated Formulas
Chlorinated carburetor cleaners provide aggressive cleaning action but may damage sensitive components. Many jurisdictions restrict their sale due to environmental concerns. Non-chlorinated alternatives offer gentler cleaning while maintaining effectiveness, making them preferred for modern applications.
Environmental Impact Considerations
Eco-friendly carburetor cleaners reduce environmental impact while delivering professional results. VOC-compliant formulas meet stringent air quality standards without sacrificing cleaning power. Responsible shops prioritize sustainable carburetor maintenance products that protect both equipment and environment.
Application Method Selection
Spray carburetor cleaners excel for routine maintenance and assembled components. Immersion cleaners provide superior results for complete rebuilds and heavily contaminated parts. Professional-grade shops often stock both types for comprehensive service capabilities.
Professional Carburetor Cleaning Techniques
Safety Protocol Implementation
Proper safety equipment protects against chemical exposure and fumes. Always wear nitrile gloves, safety glasses, and ensure adequate ventilation when using industrial-strength carburetor cleaners. Keep emergency eyewash stations accessible in professional environments.
Step-by-Step Carburetor Cleaning Process
1. Component Removal and Documentation Photograph connections before disassembly to ensure proper reassembly. Remove all linkages, hoses, and electrical connections carefully. Label components to prevent confusion during reinstallation.
2. Systematic Disassembly Remove the float bowl, noting screw orientation and torque specifications. Extract idle screws, air screws, and jets using appropriate tools. Separate all rubber gaskets and O-rings for individual cleaning or replacement.
**3. Deep Cleaning Application Apply concentrated carburetor cleaner according to manufacturer specifications. For immersion cleaning, submerge components for recommended duration. Use soft brushes for stubborn deposits while avoiding damage to precision surfaces.
4. Thorough Inspection and Reassembly Inspect all passages for complete cleaning and proper clearances. Replace worn gaskets and seals with OEM-quality components. Reassemble in reverse order, applying proper torque specifications.
Advanced Carburetor Maintenance Tips 💡
Fuel System Optimization
Using high-quality carburetor cleaners regularly prevents deposit accumulation and extends service intervals. Professional mechanics recommend cleaning carburetors every 100 hours of operation or annually, whichever comes first.
Storage and Preservation
The real cure is to use Gasoline Stabilizer in your gas whenever the bike is going to sit, unused, for a long period of time. Proper fuel stabilization prevents varnish formation that requires aggressive cleaning later.
Troubleshooting Common Issues
Engine Won’t Start: Often indicates clogged main jets or fuel passages. Use powerful carburetor degreasers for complete cleaning.
Rough Idle: Usually caused by contaminated idle circuits. Precision carburetor cleaners with applicator straws target these small passages effectively.
Poor Acceleration: May result from restricted accelerator pump or high-speed circuits. Professional carburetor solvents dissolve these stubborn deposits.
External Resources: